The Best of the Joy of Painting with Bob Ross
A Spectacular View
Season 34 Episode 3402 | 25m 21sVideo has Closed Captions
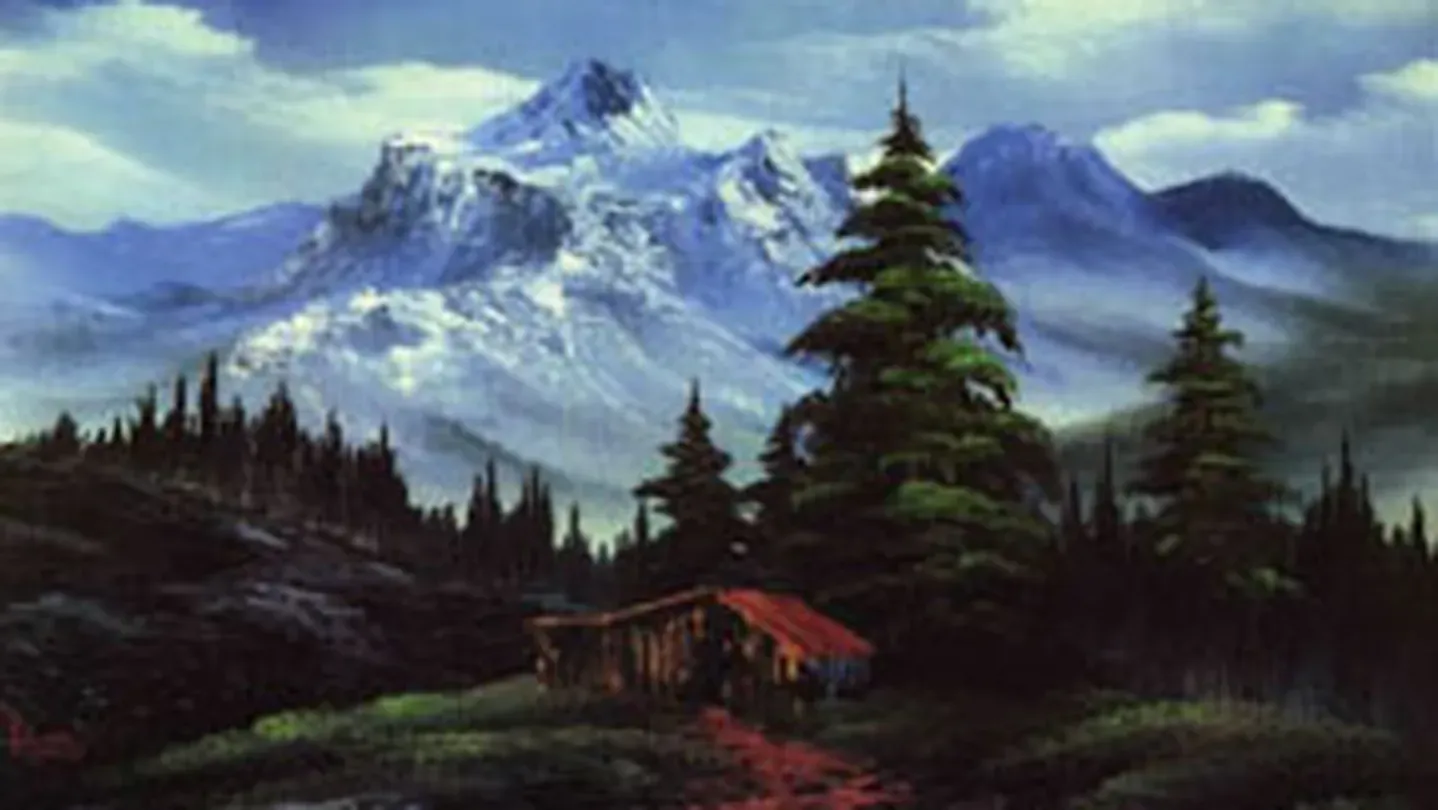
Bob Ross paints a mountain-top home with views of distant snow-covered mountains.
Bob Ross invites you to a quaint little mountain-top home with breathtaking views of distant snow-covered mountains.
Problems playing video? | Closed Captioning Feedback
Problems playing video? | Closed Captioning Feedback
Distributed nationally by American Public Television
The Best of the Joy of Painting with Bob Ross
A Spectacular View
Season 34 Episode 3402 | 25m 21sVideo has Closed Captions
Bob Ross invites you to a quaint little mountain-top home with breathtaking views of distant snow-covered mountains.
Problems playing video? | Closed Captioning Feedback
How to Watch The Best of the Joy of Painting with Bob Ross
The Best of the Joy of Painting with Bob Ross is available to stream on pbs.org and the free PBS App, available on iPhone, Apple TV, Android TV, Android smartphones, Amazon Fire TV, Amazon Fire Tablet, Roku, Samsung Smart TV, and Vizio.
Providing Support for PBS.org
Learn Moreabout PBS online sponsorship[MUSIC] Hi, welcome back.
Certainly glad to see you today.
Thought today we'd do the little painting that you see at the opening of each show.
So let's start out and have them run all the colors across the screen that you need to paint along with us.
While they're doing that, let me show you what I got up here.
I have my standard old canvas.
This is a double-primed, pre- stretched canvas and I'm using an 18 x 24, but you use whatever size is convenient.
And I've just covered the entire canvas with a little bit of Liquid White, that's all, just Liquid White.
And with that, let's have some fun.
I'm going to start with Prussian Blue, the old 2 inch brush.
Prussian Blue, it's a very strong blue.
I like Prussian Blue.
Okay, let's go up in here.
We start up here in the corner and we just make little x's or little crisscross strokes.
Something about like that.
Mm, now this will not be an exact duplicate of what you see at the beginning of the show, but it'll give you an idea of how it was made.
There we are.
Because we have no patterns, we use no tracings, no drawings, so nothing ever comes out exactly the same.
But, as I say once again, it'll show you how it was made, and when you create your own you add anything or subtract anything from it that you want.
There we are.
We just bring it on down about like, about like that.
Wherever you want it.
Okay, I'm going to go right into some Midnight Black.
I want to darken these corners.
I'm darkening this because this little painting has a lot of clouds in it and I want them to stand out.
So the way to make them look brighter is to make the sky darker.
Makes sense doesn't it?
There we are.
Okay.
And down here we can just wipe off the brush cause it won't hurt anything.
And it gets it pretty clean.
Now then.
I have several of these old brushes going so I don't have to spend all of my time washing brushes.
Let's go into some Titanium White.
Just tap the brush or wipe it, it doesn't matter, just get some paint on it here.
And let's go up in here and let's just take and begin tapping this.
Just tap it.
Like so.
Let me get a little more color on the brush.
There.
And all we're looking for here is very basic shapes.
We're not, we're not looking for any detail at all.
Just let that blend right on out.
Something about like that.
There.
Alright, a little more of the Titanium White.
Another little cloud right here.
And you put as many clouds in your world as you want.
As many as you want or as few.
Maybe you don't want any clouds in your world, it's up to you.
Up to you, totally and completely.
That's what I like about painting, it gives you, it gives you freedom.
You can experience any world that you want.
You can put any dream here that you can conceive.
Alright.
Something about like that.
But all we're doing is just putting in some basic little shapes, we really don't care.
We're going to take the blender brush in a minute here and just blend these out and, because the canvas is wet up here, you can literally move color.
You can make it slide right on the canvas.
Well, we have a sky full of clouds here.
Maybe, yeah, why not right there.
Something about like that.
Let that blend right on out to nothing.
Wherever, wherever.
Alright, let's get our little blender brush.
These little blender, blender brushes are very, very soft.
As my father used to say they're tender as a mother's love.
There we are.
There.
And in my case that was certainly true.
I'm very prejudiced, but I think I had the greatest mother there was.
Beautiful, beautiful lady.
And I hope she's watching now.
There.
Just, see how you fluff that up with that little blender?
It just goes right over, right over.
There.
Okay.
And once again, in your world, you decide how many clouds live in it or how few.
And that's basically all there is to making a lot of clouds very quickly.
Okay, we'll wash the old blender brush off.
And I'll wash it the same way, a little paint thinner in there.
It's not as much fun to beat that one though.
Doesn't make near the mess.
With the little blender, I normally, normally wipe it on a paper towel or a clean rag afterwards cause you want it as dry as possible.
Going to take some black, some Prussian Blue, a little brown, a little Alizarin Crimson, whatever.
Maybe a little more of that crimson.
I like crimson.
It's one of my favorite colors.
Alright.
Pull it out as flat as you can get it, cut across, get a little roll of paint.
There, you can see it.
Right on the edge of the knife.
And we had a mountain in our world and it lived right here.
All we're looking for initially is the shape of the top here.
That's really all we're looking for.
We could care less what's happening elsewhere.
We will later, but right now that's all we're looking for.
Right there.
[Bob makes "sssssoo" sound] Just this nice outside edge up here.
That's all, that's all.
Very little paint.
All we're doing is staining the canvas.
There.
Does not take a lot of paint.
We'll put a little bump right there.
See?
Just make a decision and drop it in.
In your world you have total and absolute power.
Scrape it hard.
You can probably here that.
Get in there and pull that paint off.
You cannot get it all off.
Don't worry about it.
The only way you could get the canvas back to where you could paint another color is to wash it with paint thinner, just rinse it off.
Which is okay, I do that frequently.
If I don't care for a painting, I just wipe it off and take a little paint thinner, wipe down the canvas, let it dry.
Now there'll be a stain on there still, but when you put your Liquid White, black, clear, whatever on it, it's okay.
You can paint right over it.
Give it a few minutes to dry, though, after you take the paint thinner and wipe it down.
Alright.
Something about like that.
You know, one of the questions I hear over and over in the letters that we get from fantastic people all over the country is: "Can I use acrylics to do this?"
I wish, I wish you could.
Acrylics, they're a fantastic medium, but they just dry too rapidly.
This is a wet-on-wet technique so we depend on it staying wet through the entire painting.
If it doesn't, then we've defeated our purpose.
Sorry to jump around like that.
Just jump all over the canvas.
There.
Maybe here and there, we'll just blend up a -- put a little Titanium White on there.
I want to create a misty effect down here at the base.
And, make that a little lighter and then we can go back, tap a little of that mountain color in and put the indication of some little things that are far away back in here, just by tapping, just tapping.
These are going to be the ones in the background when we're done, if everything works just right.
There.
I touched a little touch of the Cadmium Yellow.
Very, very small amount and it'll give an instant green.
It looks like little green things that are growing up the side of the mountain far away, way, way back there.
We don't even know how far back it is.
Don't know that we even care.
Many, many, many miles.
Alright.
Over here now, we can pull this one down.
[Bob makes "tchoo" sound] Just grab it and pull it.
Pull it.
[Bob makes "sssssoo" sound] We'll let it come right into that.
There we go.
And all I'm doing here is blending out the paint.
I want to remove as much paint as possible so the next layer will stick easier.
See, it's mixing with the Liquid White and automatically this beautiful mist will happen.
You don't even have to think about it.
It happens.
There we go.
So you can spend all your thinking time, thinking about your painting.
There.
Alright.
Let's, let's take Titanium White and pull it out as flat as you can get it.
See?
Just pull it out.
Take the knife, go straight down on it.
Cut across, get a little roll of paint.
And in our world, now, no pressure, no pressure.
Just let this knife just bounce and play right down through there.
And think, let's have the light coming from the right in this one.
If you're right handed, that's normally easier.
Just think where light would strike and play here, and let it go.
Don't just try to copy.
In your mind, decide where all these little highlights live in your mountains, cause your mountains may be different than mine.
They're probably much better.
Just, there comes a little light.
Just let it play.
[Bob makes "sssoo" sound] We had a little ridge right there.
See?
That's all there is to it.
Mountains, to me, are one of the most fun and enjoyable things to paint.
I love 'em.
I love mountains.
I, I think I've mentioned many times before, I lived in Alaska for a long time and Alaska has some of the most gorgeous mountains that God has ever made.
There we are.
I think you could, you could find enough material to paint there to last a lifetime.
Alright.
And if you don't have the good fortune of living in an area where there's all these beautiful, beautiful mountains, you can go to the library or anywhere and pick up books that show pictures you can -- art books have pictures in them.
There's many, many ways you can find photographs or drawings of mountains that'll allow you to paint some, if you want to.
Maybe you want to do this without a mountain in it.
And that's okay too.
Okay, little bit of this blue color and I'm going to go right back up in here [Bob makes "sssoo" sound] and just begin adding in some shadows.
Once again, this will not be an exact duplicate of what was on TV at the beginning of the show, but it will certainly show you how it was made.
There, see there?
All those things that happen there just by changing some angles.
I'm going to grab the small knife.
It gets into these little places so much better sometime.
There.
Very gently, no pressure, no pressure.
I can't say that enough times.
I get, I get letters every day that say: "I'm having trouble making the, the paint break, or leave all these little holes."
One of two things is happening: you're using a paint that's soft and it won't work or chances are, you're applying too much pressure.
What I used to have students do when I was teaching every day, I'd have them practice on their palette 'til they could, every time, pull that paint across there and make it break.
And the palette's made of Plexiglas, so if you can make it break on the Plexiglas, shoot, [laughs] when you get to, when you get to canvas it's easy.
I'm just tapping the bottom here.
I want to blend this out a little bit.
There.
Following the angles, always following those angles.
Now sometimes we come from a camera that gives you sort of a funny angle.
So if that happens, don't, don't think your painting should look like that, we're coming from a different angle.
Okay.
That's a, that's a question I hear frequently is: "I see you look to the side, what are you looking at over there?"
I have a television monitor that's right off camera so I can see exactly what you're seeing.
And then we have some of the most fantastic camera people in the business here.
And they, they'll look at what I'm looking at and between us we'll turn everything so you can see it the best, and get the best results at home.
There we go.
Taking a little of that, a little Indian Yellow, Yellow Ochre and some of that bluish color I had on the, on the brush, and that immediately will make a nice green.
And we'll just sort of vary back and forth here some of these colors.
Something about like that.
And then lift it upward.
Make it look like little trees that live far back here.
Little tiny trees, little baby trees, but they're really big, but they just live far away.
Far, far away.
There we are.
Alright.
I think I mentioned in some of the previous shows that the program is now playing in Japan.
And recently we sent, we sent a whole bunch of paintings, original, original Bob Ross paintings over, and they did a big exhibit and hundreds and hundreds of people came to see the paintings.
It's fantastic.
It's fantastic.
There, a little bit right in there.
Alright.
Time to have some fun.
Let's take, we'll take some Prussian Blue, some black, some crimson, and I'll put some Sap Green in there too.
There we go.
I'll mix up quite a bit of color, like that.
I'm going to clean the old knife.
Let's make the little trees that were in the background.
For that -- there's a fan brush and it's clean [laughs].
Let's go right into this very dark color.
This color should look black on your palette.
But because of the Prussian Blue, it'll be predominantly blue.
Let's go up in here.
And we'll have some little trees live right in here.
All we're doing is just touching and tapping downward, that's all, that's all.
Very, very simple, don't make it complicated.
When they start breaking apart like that it means it's time to reload the brush.
There.
Alright.
Maybe they come right in there.
Wherever.
And really the only thing you're concerned about is these nice tops.
What's happening in here, you could care less, at this point.
Maybe later it'll become important, but at this point we don't even care.
Maybe we'll have these a little higher and drop down.
Now sometimes people say: "Mine look like fence posts."
See?
Like that.
If they look like fence posts, the only thing that's wrong is you don't have enough.
Just go back and fill them up, cause as you know, we don't make mistakes.
In our world, we only have happy accidents.
And very quickly, very quickly you learn to work with anything that happens on this canvas, anything.
And it takes the fear out of painting.
You don't worry about it.
Because for so long we've been taught, we've been taught that you had to be blessed by Michelangelo at birth or you couldn't paint.
Now you may not be able to paint like he did, but you can sure paint this way.
There we go, cause this works.
And we got trees all the way across.
Sometimes it's fun - take a little white, and you'll make it look like little tree trunks back here.
Just take a little white and very gently grab that and lift upward.
Just a little, don't overdo, don't overdo.
Don't overdo it.
It looks like little tree trunks far back in the distance.
You can take the knife and also cut through it and it'll, it'll give an effect that's very nice.
Okay.
Time to have more fun.
Let's go in the, let's go into that dark color.
This is predominantly black.
[Bob makes "ssssst" sound] And let's have, maybe [Bob makes "shoo" sound] we'll have some big rocks right there.
Predominantly black though.
There's some big rocks.
All we're doing is filling in paint here.
We could, we could really do this with, we could do this with a paint roller.
It doesn't matter how you put this on.
Just want to cover the canvas.
In fact, if I had thought a little bit, we could of, we could have done the bottom with Black Gesso, and this would have already been done.
Or you could have used Liquid Black.
The difference between Liquid Black and Black Gesso: Liquid Black is an oil based medium.
It's designed to stay wet several days on a good canvas.
Black Gesso is an acrylic base.
It's designed to dry very rapidly.
It's for when you want to work on a dry service, surface.
Liquid Black is when you want to work on a wet surface.
So it just depends on your mood.
There.
Both mediums have their own characteristics and they're both neat.
There we are.
Something about like that.
All we're doing is just covering it up.
Now then.
Going to make a little, a little black, a little white, mix them, a gray color.
Well there's a little touch of blue in there too.
Okay, black, white, a little touch of blue then.
[laughs] Whatever happens.
Pull it out like so but it's marbled, we haven't overmixed it.
Little roll of paint on the knife, and let's go right up in here and begin just putting the indication of all these little rocks and stones.
Let me stand over here.
Just let the knife touch and sort of bounce along there.
Don't overdo.
Don't overdo.
Just let it bounce.
Let it bounce and play.
Change the angle so they look, some of them look different.
This is far away, we don't know what it is.
About like that.
And I want to get darker and darker down here toward the base, so it gives the impression that more light's hitting the top than down here at the bottom.
That's all there is to it.
Okay.
Let's build us a tree or two or three.
For that, I think I'll use the little oval brush today.
It's easy to distinguish; it has a black handle.
Rest of them all have white handles.
Alright.
We had a big tree in our world and it lived right there.
[Bob makes "ssoo" sound] Touch, make a little line, then we start just like we do with the fan brush, using just the corner, just the corner.
And on this brush, once we get down though, we go straight in and it makes those gorgeous, gorgeous hangy downs that you see on evergreen trees.
In some parts of the country the limbs hang down really low.
They really hang down.
In other parts of the country they stick straighter out.
So it just depends, I think, on where the tree lives.
Maybe it has to do with water, I don't know, sunlight.
Don't know.
There we go.
Another little tree there.
Go right into some yellow.
Just take the same old brush, go into Yellow Ochre, Cad Yellow, to make a green, and then very lightly.
We said our highlight was coming from the right side -- I'm going to add a little Liquid White, make it a little thinner -- our highlights are coming from the right, light's coming from the right so that's where we want to put the most emphasis.
There, and let it get darker and darker down toward the bottom, until it just disappears.
There we go, something about like that.
But darker and darker toward the base, that's important, it's most important.
Alright, we had a little house in there.
Little house lived right here.
So, all you do is touch and begin scraping out a basic shape.
Our little house looks something like that.
Scrape off all that excess color.
Just get in there and scrape it off.
We'll use a little bit of the Van Dyke Brown, Dark Sienna mixed together.
[Bob makes "sssoo" sound] Let's just fill it in.
Just fill it in.
It's a little, like a lean to on the side of this house.
There.
Van Dyke Brown, Dark Sienna mixed together.
That's all there is to it.
See?
Just, all we're doing is blocking it in at this point.
Now we'll take the brown, put some Bright Red in it, a little white, a little white.
And for that, let me come back up here [Bob makes "sssoo" sound] and we'll just put in a little roof.
There.
Boy, wouldn't this be a gorgeous, gorgeous place to live?
Look out over all these beautiful mountains and trees, mm.
I'd like to have this cabin.
Take a little, little lighter color and just highlight it a little so this edge stands out.
[Bob makes "tchoo, tchoo, too" sounds] just a little, like that.
And we go back to our brown and whites and let's put in -- touch[Bob makes "sssoo, sssooo" sounds] touch a little highlights right there.
Something about like that.
And over here on the side I'm going to add a little bit of that Prussian Blue, I want it to look more like it's in shadow.
[Bob makes "sssoo" sound] There, maybe even a little darker than that.
Ooh yeah, that's much better.
Want that to be dark.
Little Van Dyke Brown and just touch.
Make it look like old boards, slabs, whatever you want to call them.
And we need a door in our cabin.
This old guy had to have a way to get in there.
Shoot, cut across.
A little bit of the light color just to outline the, the door a little.
Wipe off the old knife here.
Tell you what, let me go back to an old 2 inch brush.
Dip it in a little bit of the Liquid White, go into a little bit of my yellows.
We had a little grass around this, bottom of this cabin.
So we'll use all the colors here, the yellows, a little touch of red once in a while.
Here it comes.
But this paint has to be quite thin because we have so much paint already on the canvas.
Each layer of paint needs to get thinner and thinner.
There we go.
Just tapping.
We need a path.
[laughs] Got to have a path, no way to get up in here.
Take a little bit of that brown color.
I want it brighter than that.
I can't, I can't make that out.
Put a little Dark Sienna in there, a little Bright Red.
There.
He may come home a little impaired and he needs a path he can see when he comes in here.
Can't ever tell, that happens sometimes.
A little Sap Green.
Here we go.
Now you just begin deciding where everything lives in here.
About like that.
Want to make this look like a little hill here.
Shoot, maybe it comes all the way up in here.
Something about like that.
Wherever.
In your world you decide, you decide.
A little black, a little white.
Maybe there's just the indication here and there of a little stone and a rock that lives in there.
And that's basically how we did that little painting.
Scratch in a stick and a twig.
Shoot, you finished.
Hope you've enjoyed this one.
As I say, it'll show you how the little opening was made.
So from all of us here, I'd like to wish you happy painting and God bless, my friend.
To order a 256 page book of Bob's 60 favorite paintings or his detailed 3 hour workshop DVD call 1-800-Bob Ross or visit BobRoss.com.
[MUSIC] [MUSIC]


- Arts and Music

Innovative musicians from every genre perform live in the longest-running music series.


Support for PBS provided by:
Distributed nationally by American Public Television